Simulate IoT real time messages with Mapify Data Feed Simulator
September 22, 2021
Mário Sobral
In this post we’ll show yo how you can use Mapify Data Feed Simulator to simulate real time MQTT messages being sent by a fictional vehicle to a Mapify Data Feed. You can use this tool to quickly and easily test your Mapify Workflows and IoT real time processes without requiring you to set up physical devices. And all of that without having to write a single line of code!
It is not the purpose of this article to explain or deep dive into Data Feeds, Workflows or other Mapify features, so we will assume you have read some of the previous articles which focus on those topics.
Requirements
- Mapify account (you can request a trial account here)
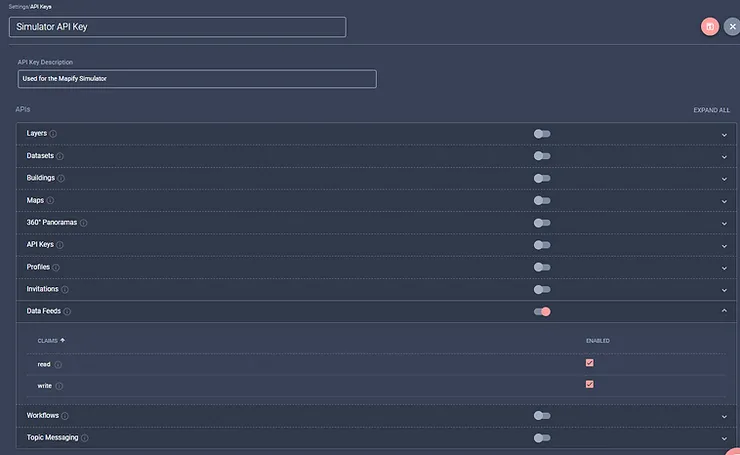
- Mapify API Key (to be used by the simulator to connect to your account)
Make sure the API Key selected for this example has both read and write permissions for the “Data Feeds” claim.
If you want to dive right in the deep end without following this tutorial, feel free to request a Mapify trial here, or click here to schedule a talk with us, and start creating your location intelligence solutions today!
One of the most well known uses for a real time sensor feed is to track moving vehicles, and to create rules for monitoring those vehicles, such as defining geo-fences and alerts.
In this article we will simulate a moving vehicle’s Data Feed and show you how you can quickly and easily setup and configure your own tracking solution without writing a single line of code.
The first thing is to specify the JSON schema of the incoming messages originating from our fictional vehicles. For this example we will consider the messages’ JSON schema as shown below:
{
"type": "object",
"properties": {
"id": {
"type": "string"
},
"gear": {
"type": "string"
},
"temperature": {
"type": "number"
},
"doorOpen": {
"type": "boolean"
},
"location": {
"type": "object",
"properties": {
"type": {
"type": "MultiPoint"
},
"coordinates": {
"type": "array"
}
}
}
}
}
Each message will have a string id attribute to identify the vehicle license plate from which the message originates, a string gear attribute for the currently engaged gear, a numeric temperature attribute which contains an engine temperature value, a doorOpen boolean attribute to determine if the vehicle’s cargo door is open, and an object attribute for the location information of the vehicle.
For the sake of this article, let’s imagine that we want to simulate a vehicle with license plate “ABC123”. We will simulate changes in the vehicle’s engine temperature, current gear, if its cargo door is open, and display the vehicle latest position in real time on a map.
That’s all we need to start using our Mapify Simulator!
Create a Dataset
First of all, we will create Dataset named My Vehicles Fleet to hold the latest vehicle positions data. This will also allow us to make real time updates to its data through a Workflow, and render it using a Mapify Realtime Layer. Add the following attributes to the Dataset:


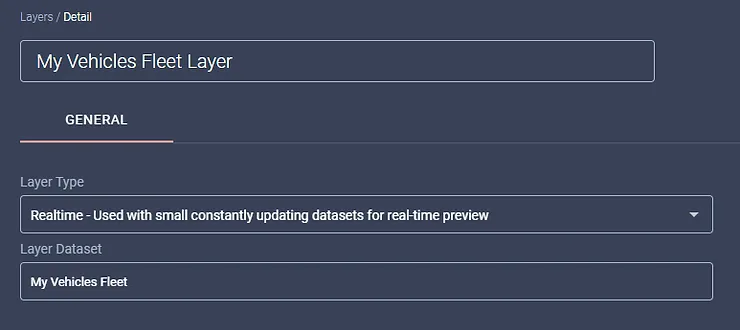
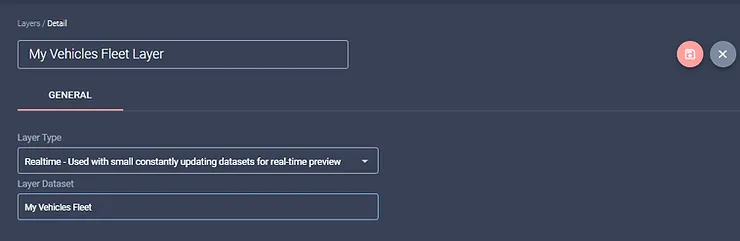
Create a Realtime Layer
In order to be able to later render the vehicles, you need to create a Mapify Realtime Layer based on the My Vehicles Fleet Dataset. The screenshot below shows the creation screen for the My Vehicles Fleet Layer:
Create a Data Feed
Next, let’s create a Push (MQTT) Data Feed named vehicle-trackers to handle the incoming messages that the simulator will generate.
This will be the JSON schema of the messages “sent” by the fictional vehicles as previously defined:
{
"type": "object",
"properties": {
"id": {
"type": "string"
},
"gear": {
"type": "string"
},
"temperature": {
"type": "number"
},
"doorOpen": {
"type": "boolean"
},
"location": {
"type": "object",
"properties": {
"type": {
"type": "MultiPoint"
},
"coordinates": {
"type": "array"
}
}
}
}
}
Copy the JSON schema above and paste it in the Data Feed schema input box.
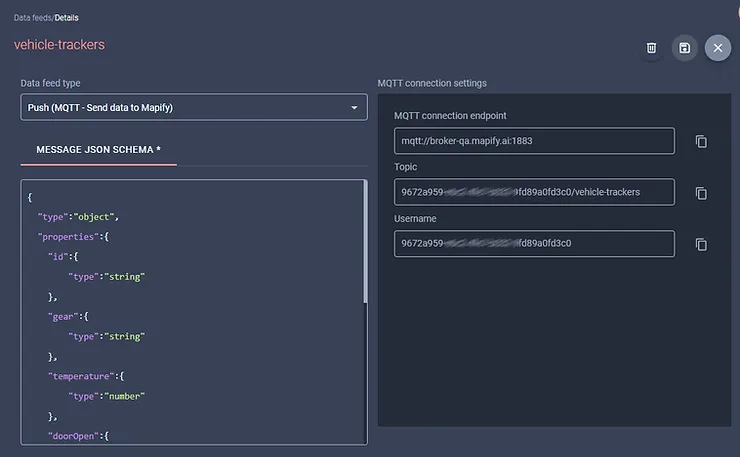
After saving the new Data Feed, you will be ready to create a simple Workflow which you will later use to confirm that the messages are arriving and being processed by Mapify.
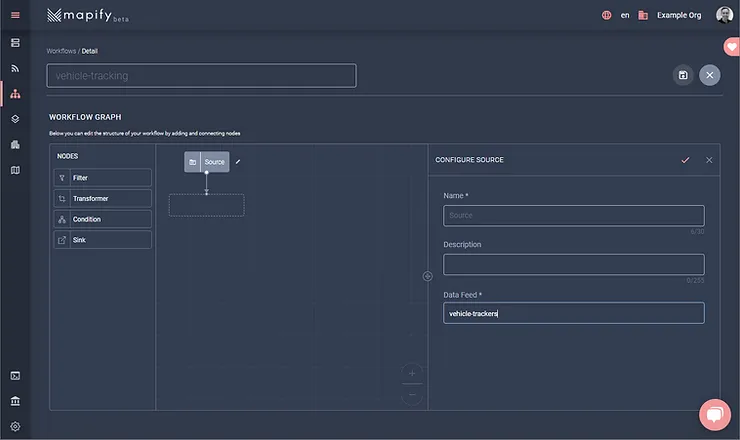
Create a Workflow
Create a new Workflow named vehicle-tracking, and add a new Source node. In the Source node, select the previously created vehicle-trackers Data Feed as its source.
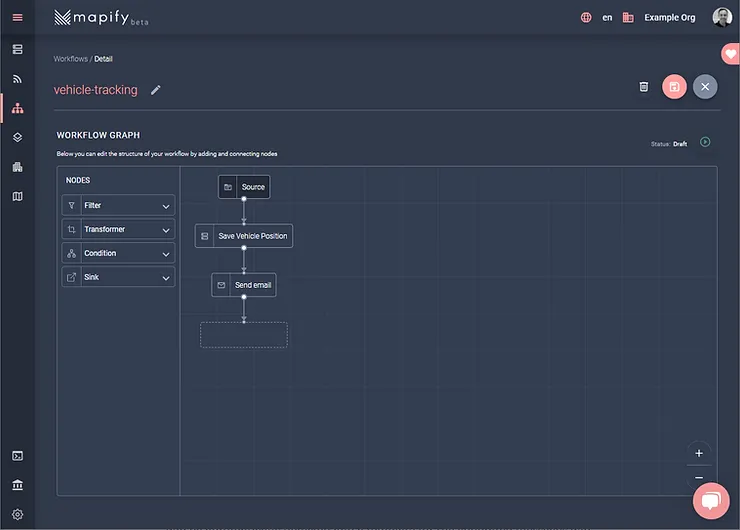
Below the Source node, add a Dataset sink node to persist the latest data from the received message to the My Vehicles Fleet Dataset, and configure it as illustrated in the screenshot below.

Now, below the Dataset sink node, add a Email sink node which cause an email to be sent when a new message arrives.
Specify the email subject as
Vehicle ${id} message received!
Add your email to the “To:” input box, and for the email Body, type something such as:
Vehicle ID: ${id}
Gear: ${gear}
Temperature: ${temperature}
Is Door Open: ${dooropen}
After adding the nodes above, your workflow should look something like the screenshot below:
Simulate those messages!
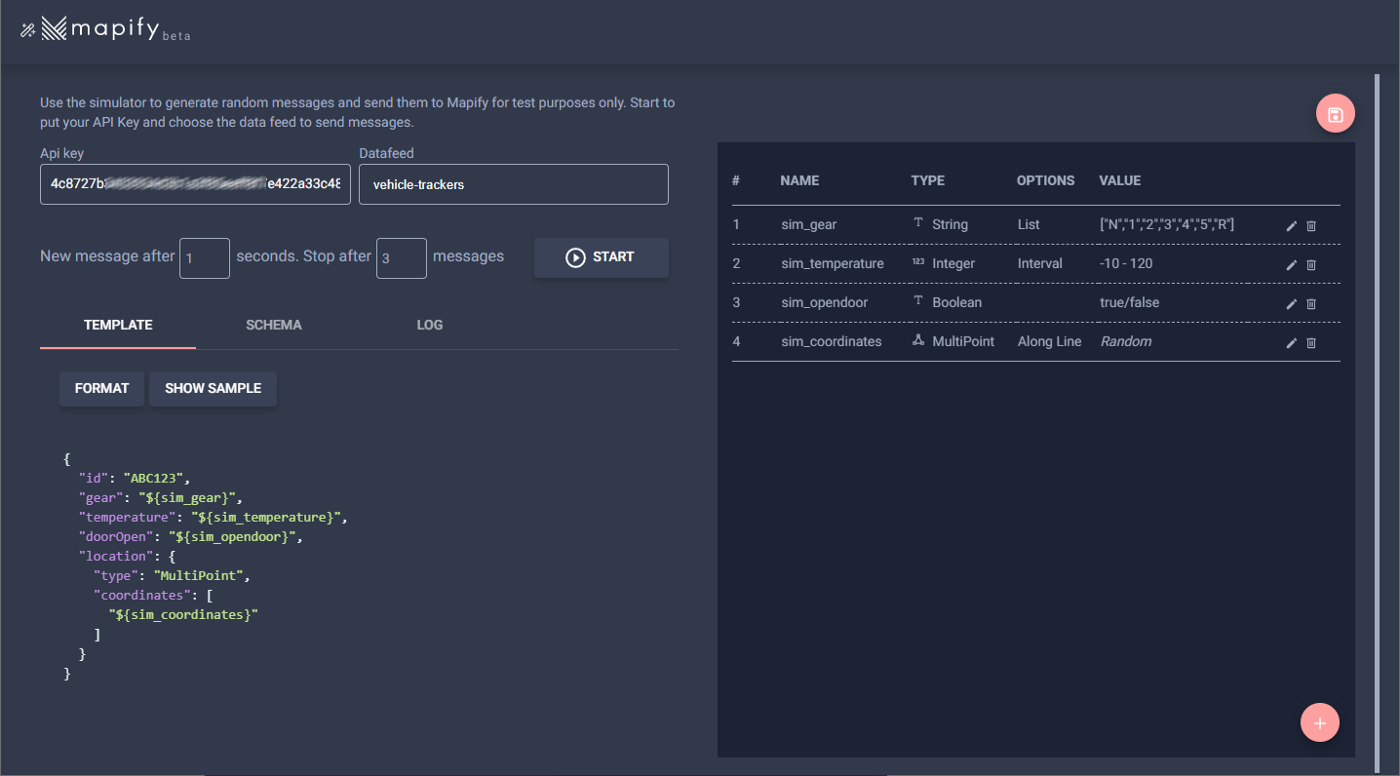
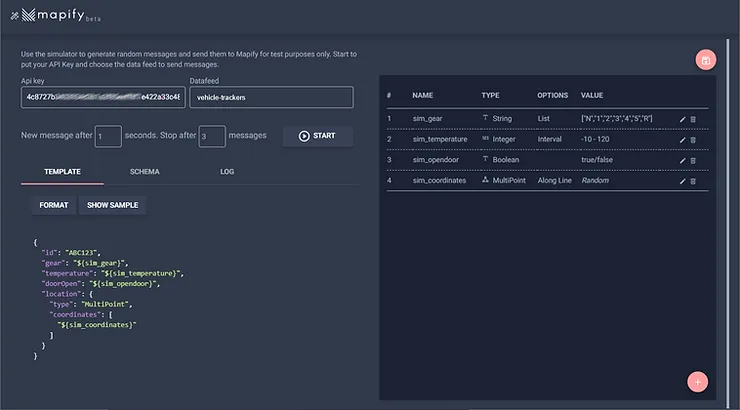
You are now ready to simulate the vehicle tracking messages, so open up Mapify Simulator on your browser, by navigating to https://simulator.mapify.ai.
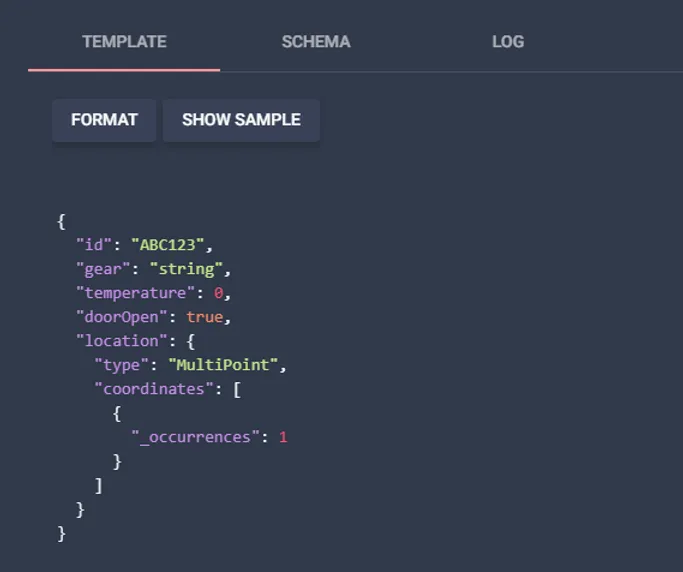
Paste your Mapify API Key in the API Key input box, and the click the Data Feed list to select the previously created vehicle-trackers Data Feed. The Data Feed schema will be automatically detected and a template for the generated messages will be displayed below in the Template tab:
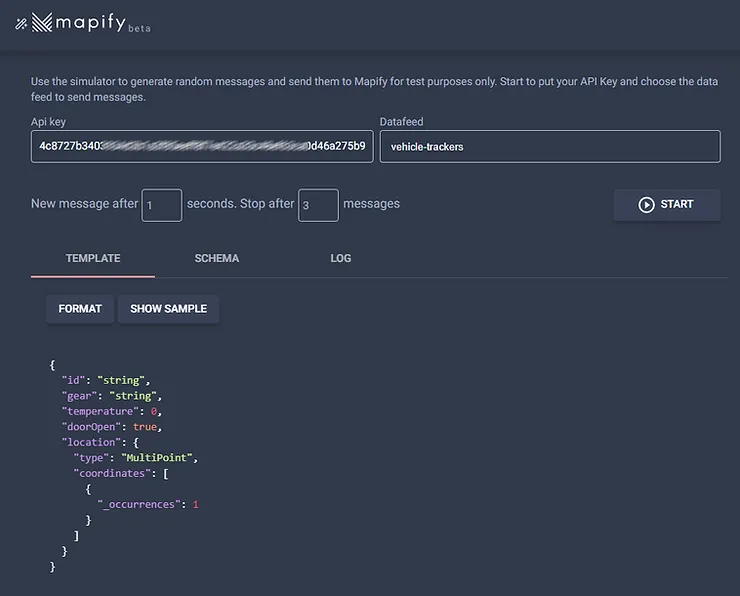
Mapify Simulator is able to generate values for the message attributes, but we need to provide some additional information for the generated values to conform to what one of our fictional vehicle trackers would send.
Let’s start with the id attribute, which is a text attribute. In the template, let’s assume for now that we only have one vehicle being tracked, and the id of the vehicle is ABC123.
In the Template, replace the “string” value of the “id” attribute with “ABC123”:
We will also assume that the vehicle has a manual shift pattern, so it can have one of 6 possible values in the gear attribute: N, 1, 2, 3, 4, 5, and R. In this case, we will need to add a custom parameter to our template.
To create the gear related custom parameter, click on the (+) button on the bottom right hand corner of the parameters list. Name the new parameter as sim_gear, select “String” from the Type drop down , and “List” from the Options dropdown.
Make sure the “Generate once per message” checkbox is enabled, so that if we needed to use the sim_gear parameter in the same message, but across multiple attributes, the same value would be used. Otherwise for every usage of the sim_gear parameter a new value would be generated, even in the same message.
In the values list below, add the seven known possible values for the gear attribute, one at a time. You should end up with something similar to this:
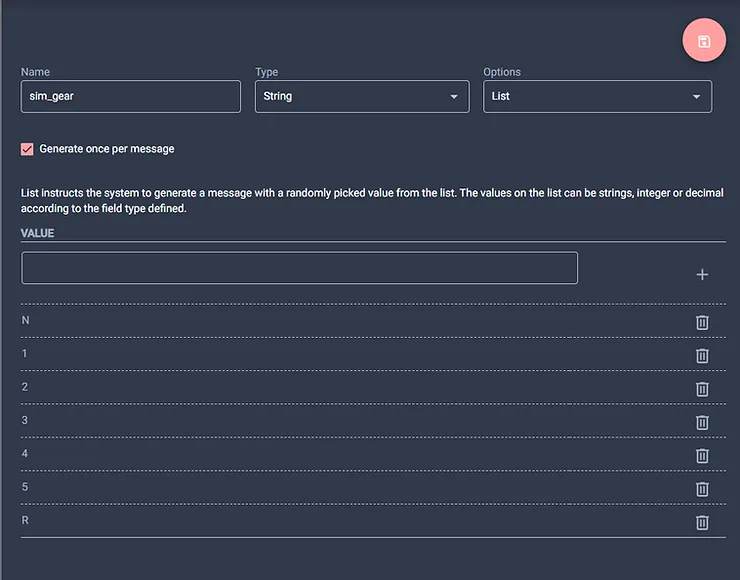
Save the changes and you will see your newly created sim_gear custom parameter on the parameters list to the right. It is ready to be used in the message template.
In the message template you need to specify where the custom parameter should be used, in order for the simulator to replace it with a generated value (according to the rules you specified). So, let’s use the sim_gear parameter you just created. Adding a parameter to the template is as easy as specifying its parameter name or ID enclosed in braces prefixed with a dollar sign, such as:
"${sim_gear}"
Looking at our current template, let’s replace the “string” value of the action attribute with the parameter we created:
{
"id": "ABC123",
"gear": "${sim_gear}",
"temperature": 0,
"doorOpen": true,
"location": {
"type": "MultiPoint",
"coordinates": [
{
"_occurrences": 1
}
]
}
}
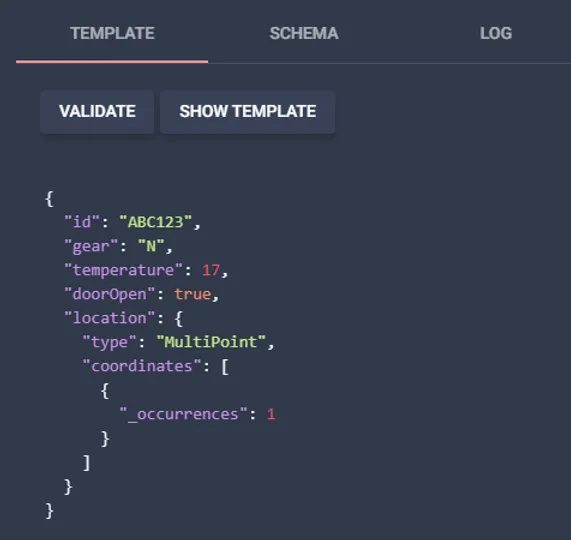
If you now click on the “Show Sample” button, you should see how Mapify Simulator would generate a new message with the parameter replaced by one of its possible values from the list:

Click on the “Show Template” button to go back to the template view.
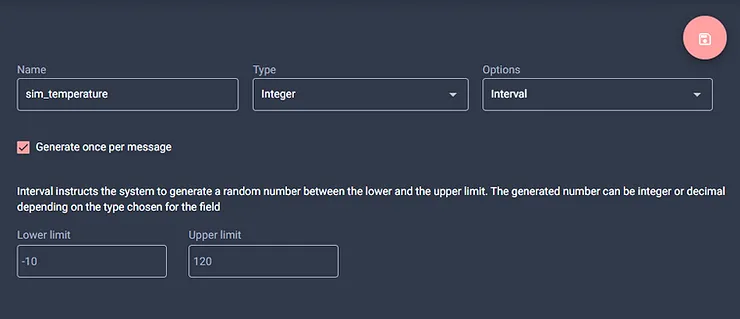
Let’s add a few more custom parameters to the template before we start sending messages to Mapify. Let’s look at temperature, which simply for the sake of this example we will consider as an integer numeric value. We will define that it will always have an integer value between -10 and 120 degrees, so let’s configure it that way!
Click on the (+) button on the bottom right hand corner of the parameters list. Name the new parameter as sim_temperature, select “Integer” from the Type drop down , and “Interval” from the Options dropdown.
Make sure the “Generate once per message” checkbox is enabled. Now specify -10 as the Lower limit and 120 as the Upper limit of the interval of values to be generated.
Save it and add it to the message template, but do not forget the inverted commas:
{
"id": "ABC123",
"gear": "${sim_gear}",
"temperature": "${sim_temperature}",
"doorOpen": true,
"location": {
"type": "MultiPoint",
"coordinates": [
{
"_occurrences": 1
}
]
}
}
If you click on the “Show Sample” button, you should see how Mapify Simulator would generate a new message with all the parameters replaced by their automatically generated values, and complying with the rules you defined.
Click on the “Show Template” button to go back to the template view.
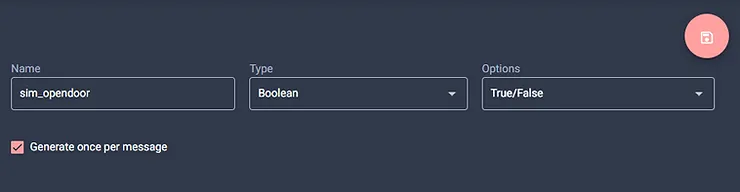
Click on the (+) button on the bottom right hand corner of the parameters list. Name the new parameter as sim_opendoor, select “Boolean” from the Type drop down , and True/False from the Options dropdown.
Make sure the “Generate once per message” checkbox is enabled.
Save it and add it to the message template, but do not forget the inverted commas:
{
"id": "ABC123",
"gear": "${sim_gear}",
"temperature": "${sim_temperature}",
"doorOpen": "${sim_opendoor}",
"location": {
"type": "MultiPoint",
"coordinates": [
{
"_occurrences": 1
}
]
}
}
One last custom parameter, for the simulator to generate valid vehicle positions.
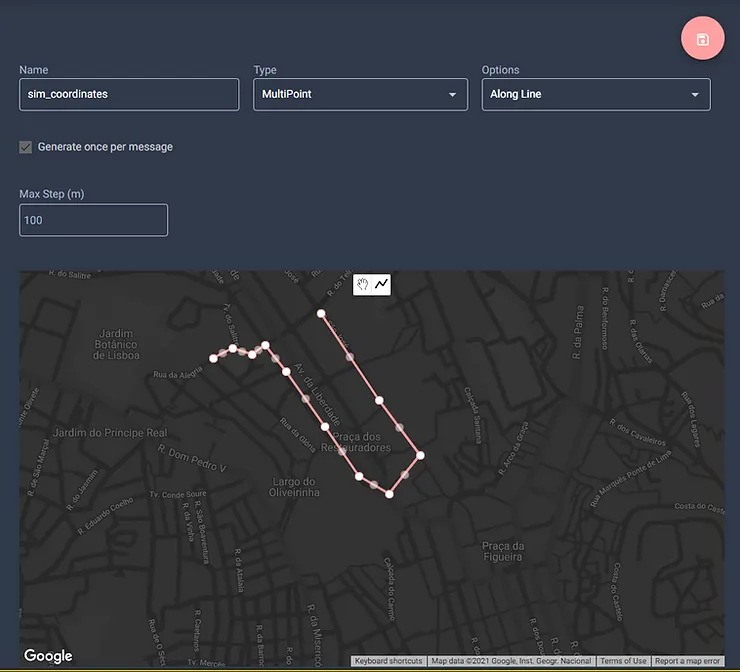
Click on the (+) button on the bottom right hand corner of the parameters list. Name the new parameter as sim_coordinates, select “MultiPoint” from the Type drop down , and Along Line from the Options dropdown. The Along Line option configures the simulator to generate coordinates along a line that you can define on a map.
You will notice that a Max Step field and a map interface will be made available below. The Max Step allows you to define the maximum distance, in meters, that the next generated position can be from the previously generated position, to provide a more realistic vehicle moving pattern. Set its value at 100 meters.
In the Map interface below, click on the line draw control, and draw a line along the map (you can simply follow a road you know, or some city streets, or even across a river or ocean), but remember that your positions will be at the maximum 100 meters apart each, so be sure to draw the line at an adequate zoom level for you to be able to actually see the vehicle movement on the map later on. Once you are done adding points to the line, double click to finish the line drawing.
At this time, you should have something like the illustration below:
Save it and add it to the message template, inside the coordinates attribute array, but again do not forget the inverted commas:
{
"id": "ABC123",
"gear": "${sim_gear}",
"temperature": "${sim_temperature}",
"doorOpen": "${sim_opendoor}",
"location": {
"type": "MultiPoint",
"coordinates": [
"${sim_coordinates}"
]
}
}
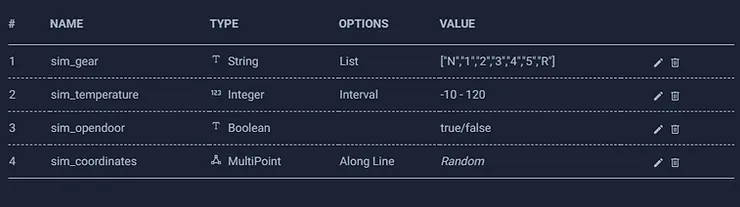
Your custom parameter list should look something like this by now:
If you click on the “Show Sample” button, you should see how Mapify Simulator would generate a new message with all the parameters replaced by their automatically generated values, and complying with the rules you defined.

Let’s run it!
You can now use the simulator to generate messages and send messages to the specified data feed, knowing the values in those messages will be generated according to the rules you specified.
For a quick test, configure the simulator to send a new message every second, and top stop after a total of ten messages (you can later change these values for whatever values make sense for a specific business case).

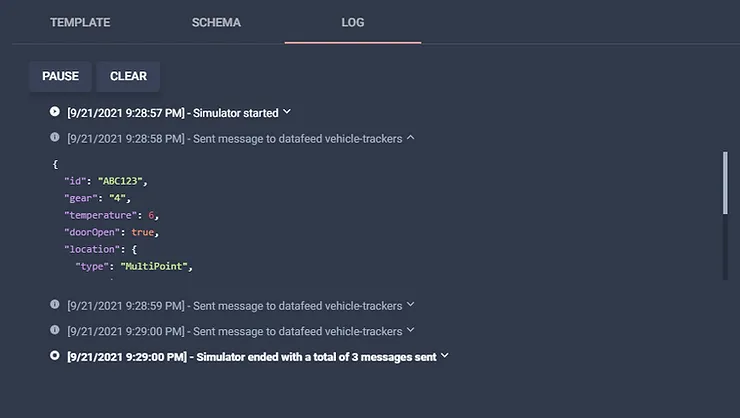
Click the Start button to have the simulator begin generating new messages and sending them to the specified Data Feed. You can confirm and view the messages sent by the simulator by clicking on the Log tab:
Now check your email, and if all went well, you should have three new emails with “Remote button pressed!” as the subject, and the body should list the values from the specific generated message:

Create Real Time Layer
In order to be able to see the vehicle location and movements on a map, you must create a Layer based on the My Vehicles Fleet Dataset.
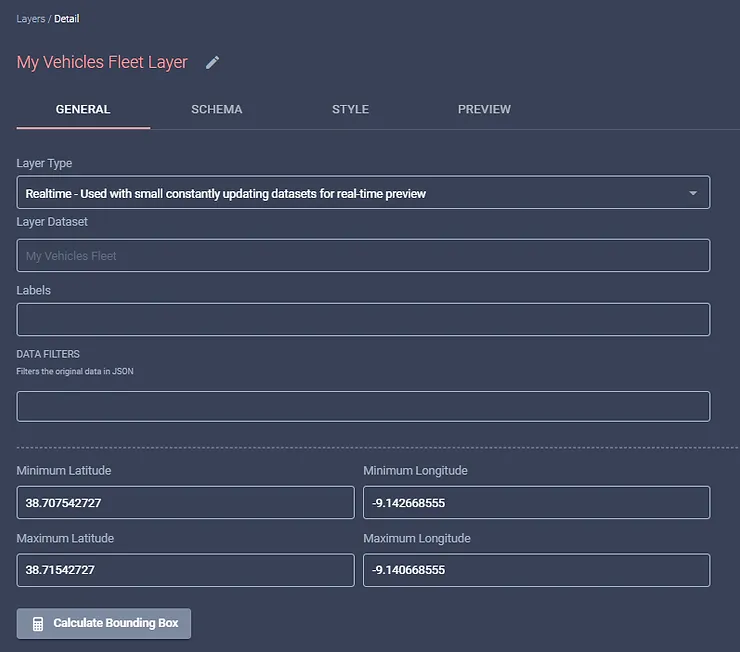
Create a new Layer, name it My Vehicles Fleet Layer, select “Realtime” as its Layer Type, select the “My Vehicles Fleet” from the Dataset dropdown list and save the new layer.
If you preview your new Realtime Layer now without any data, you will not see much. Nevertheless, for the preview to open by default in the area where the vehicle positions will be generated, open the layer details screen, and set the bounding box coordinates as:
Minimum Latitude: 38.707
Maximum Latitude: 38.715
Minimum Longitude: -9.142
Maximum Longitude: -9.140
Once you save the changes, it should look like the screenshot below:
Now, open the layer’s preview tab, and in a different browser tab start the simulator! You should see a point representing your vehicle showing up in the map, and moving when new messages are received. If you click on the vehicle point, you will see its fields’ values also changing with every message as per the rules defined in the simulator.
This is just the tip of the iceberg, you can do so much more with Mapify, Data Feeds, Datasets, Layers and Workflows, and use the simulator to make sure everything is working great before you even need any physical device.
Ready to power your solutions with Mapify? Feel free to request a Mapify trial here, or click here to schedule a talk with us and we’ll show you what Mapify can do for you and your business.

.jpg)