Monitor your IoT indoor Zigbee devices with Mapify
May 4, 2023
Mário Sobral
.webp)
It is common to associate Mapify to use cases that involve large outdoor scenarios. However, Mapify can also be an excellent choice for many IoT solutions dealing with buildings and indoor sensor data.
This article will walk you through building a simple IoT monitoring solution with a Zigbee indoor temperature and humidity sensor, which represents just one of a multitude of sensors which can typically be found inside buildings such as schools, hospitals, office buildings, factories, stadiums, and even our own homes.
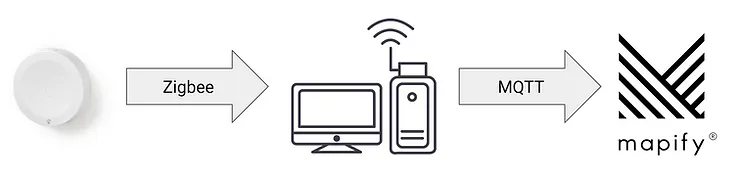
We will be using a Nedis Smart Climate Sensor, which works using the Zigbee protocol, to monitor the current temperature and humidity inside a room of a building.

In order to include the sensor as part of an indoor structure, we will set up a Building with multiple floors in Mapify. By the end of this article, you will have a fully working shareable no-code web application with a geo-located real-time view of your sensor status.
Requirements to replicate this article:
- Mapify account (you can request a trial account here).
- One Zigbee2MQTT compatible ZigBee adapter (the article examples were built using a Slaesh’s CC2652RB USB stick).
- One Zigbee2MQTT compatible device(s) that transmits data (the article examples were built using a Nedis Smart Climate Sensor).
DISCLOSURE: Mapify does not have any relationship, affiliation, or business with Slaesh or Nedis. It just happened that those were the easiest to buy and ship to Portugal.
1. Create Datasets to hold your data
The first step is to create two Mapify datasets to hold your data:
- Building floor plan for easier and more intuitive geolocation view of data
- Sensor location and current status
For the sake of brevity, we'll assume you already have a Shapefile or GeoJSON with your building floor plans. And that you have imported it into a Mapify Dataset. Make sure to select which field is the key field for each room in the floor plan (uniquely identifies a room in your floor plan).
You can then create the dataset to keep the latest data of your climate sensors (temperature and humidity), which can be configured as seen below.

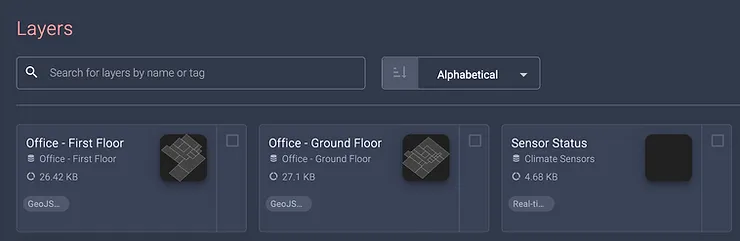
2. Create Layers to render your Datasets
The next step is to create Layers which will allow you to visualize your dataset's data over Google Maps.
- Create one Point-based real-time layer for the sensors (one layer is enough for our article demo, but you should create a sensor layer for each floor in your building).
- Create one Polygon real-time layer for each building floor.
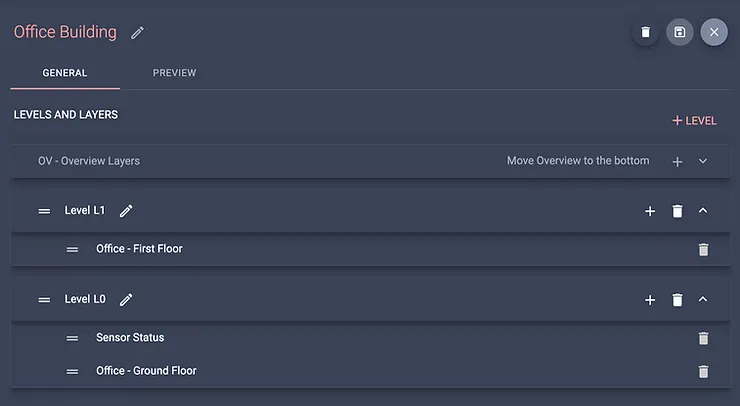
3. Set up your Building
Since you already have your layers configured, you may create and configure your building in Mapify by specifying its floors and linking the respective layers to each floor.
In the simplified example we are creating two floors, and associating one of the floor plan layers to the ground floor and the other to the first floor. You should add your sensor layer to one of the floors, which in our case will be the ground floor.
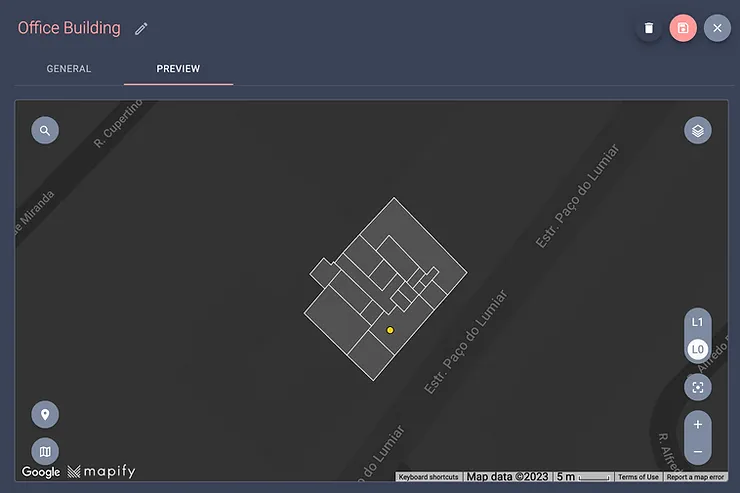
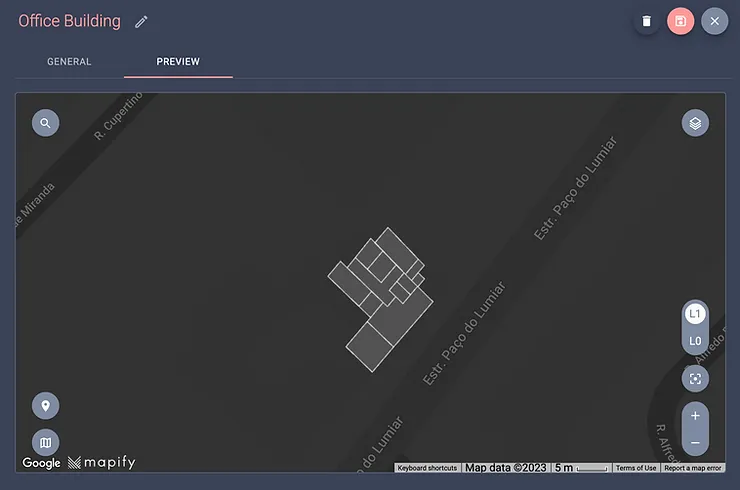
If you have followed this article's example, your building may be configured similarly to the screenshot below.
And after some layer styling, your Building preview window will display your data on a per-floor approach, allowing you to navigate between floors easily.
4. Create a Data Feed to handle incoming sensor data
Now that you have your datasets ready to hold data and layers to display it, it's time to prepare your solution to receive the sensors' data.
Mapify Data Feeds will handle all the incoming sensor data. In our example, we'll be pushing data directly to Mapify, so we'll use a Push Data Feed to generate a virtual MQTT endpoint to which data will be sent.
Create a new Data Feed named "zigbee-sensor-feed" and select the option "Send data to Mapify" from the Data Feed type drop-down list. The Nedis Smart Climate Sensor will send messages with a payload which includes the temperature, humidity, battery level, link quality, and voltage values, so paste the following JSON schema in the Data Feed Schema tab.
{
"type": "object",
"properties": {
"temperature": {
"type": "number"
},
"humidity": {
"type": "number"
},
"battery": {
"type": "number"
},
"linkquality": {
"type": "number"
},
"voltage": {
"type": "number"
}
}
}
Save your changes and your data feed configuration. It should look similar to the screenshot below (your username will differ from the one in the example).
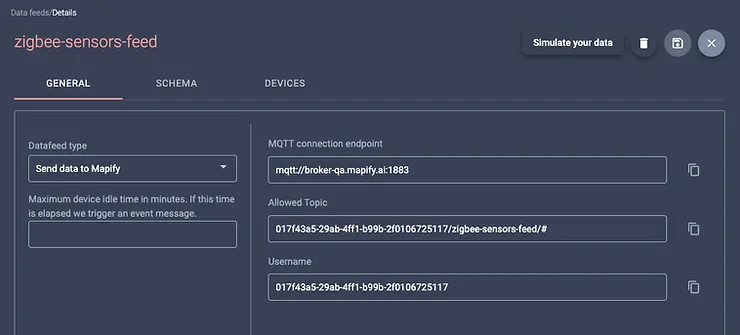
Your data feed is now ready to handle incoming MQTT messages.
5. Create a Workflow to process sensor data
Your next step should be to create a Mapify Workflow to process the incoming sensor messages, which in our case it will be something simple. The workflow will update the dataset with the latest sensor values.
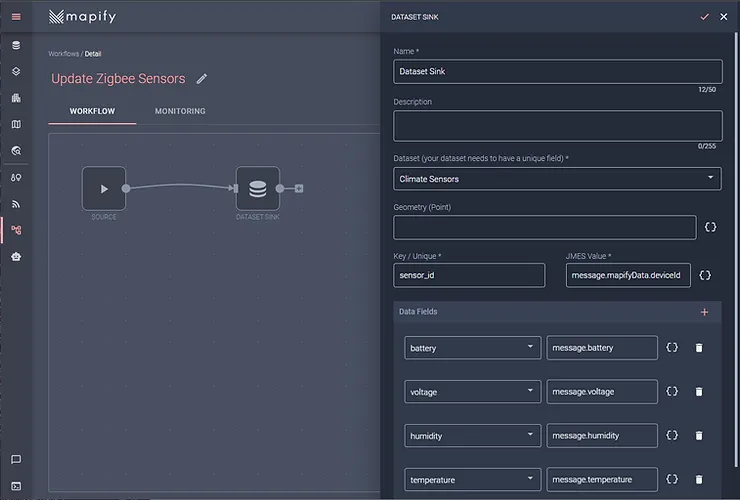
Configure the workflow's source node by selecting the data feed you created previously, and add a Dataset Sink node. This is the node that will update the climate sensor dataset with the latest data received from the sensor.
In this case, the sensor location will be already provided in the dataset, so you only need to update the remaining data fields. Specify the sensor identifier which will uniquely identify the sensor, and map the dataset fields to the related message fields. It should look similar to the screenshot below.
Once you have created your workflow, be sure to start it, so that it is actively listening for messages sent to the associated data feed.
6. Run your own Zigbee smart devices network
The next thing you’ll do is set up your Zigbee adapter and device(s) so that your climate sensor sends data to the adapter.
For the Slaesh’s CC2652RB USB stick that we use in this example, just follow the installation instructions to update its firmware with the Coordinator firmware image. Even if you have more Zigbee adapters laying around, keep in mind that you should only have one coordinator device active in your Zigbee network (read more)
Make sure the Slaesh’s CC2652RB USB stick is connected and powered by one of your machine’s USB ports. Follow these instructions to identify the port the USB adapter is connected to, and install and configure Zigbee2MQTT in your machine.
When configuring the Zigbee2MQTT broker settings in its configuration.yaml file, be sure to specify the Data Feed’s MQTT broker URL, topic, and the necessary credentials. Before adding sensors and devices to your network, be sure that the permit_join flag is set to true.
homeassistant: false
permit_join: true
mqtt:
base_topic: your-mapify-datafeed-topic-id-here/zigbee-sensors-feed
server: mqtt://broker.mapify.ai:1883
user: your-mapify-user-id-here
password: your-mapify-generated-api-key-here
serial:
port: /dev/tty.your-zigbee-usb-adapter-device-id-here
devices:
'your-zigbee-sensor-device-id-here':
friendly_name: 'climate sensor'
You should be able to have Zigbee2MQTT running on your machine now, looking something like this:
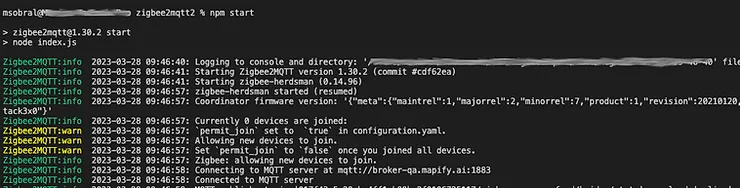
The next step is to have the Nedis Smart Climate Control send data to the adapter. For that to happen, you need to pair the climate sensor with your adapter. Follow these instructions for pairing devices with a Zigbee adapter, but for the Nedis sensor used here, it is as simple as resetting it (hold the sensor button for over 5 seconds) while near the adapter.
In a few seconds your sensor will be detected and connected to your Zigbee network, and your console should display something similar to this (device ID and topic ID will be different in your case):

If you configured Zigbee2MQTT correctly, your data feed should already be receiving messages from your sensor in real-time.
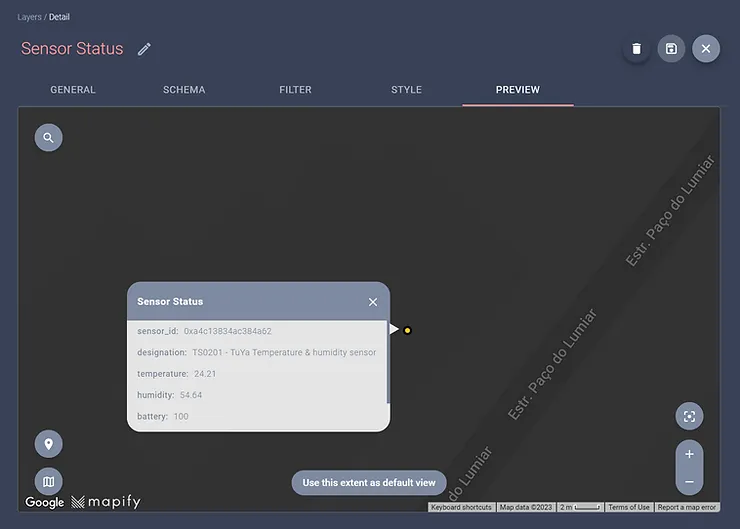
Now you should be able to go to the Climate Sensor layer preview tab and see the sensor values updated in real-time.
7. Create a Map with your building and sensor layers
Mapify allows you to compose all your layers and buildings into a cohesive Map which provides an intuitive view of all your data in an aggregated way. Even though our example does not include more layers (such as layers to provide context around the building, for example), to create a no-code application you will need to create a Mapify Map.
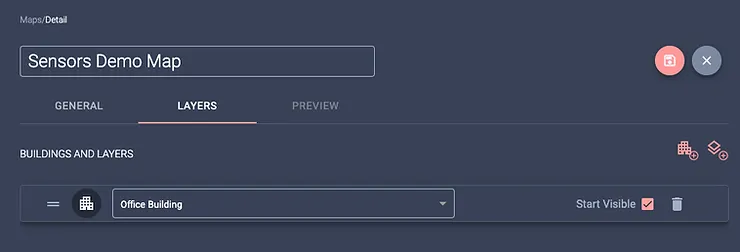
Creating a Map is very simple, you just give it a name, select the groups of layers and buildings to be included, define their rendering order and that's it. Since we only have a single building in this example, the map configuration will look similar to this:
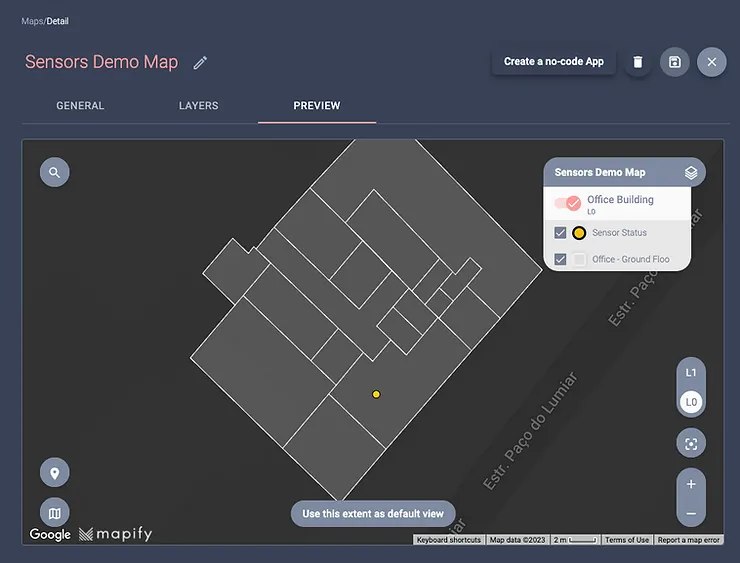
If you check the Preview tab, you will be able to test things out, including the building floor selector and layers visibility toggle from the legend.
8. Create a shareable no-code Mapify App
Once you have your map configured, it is as simple as clicking the "Create a no-code App" for Mapify to provide you with a no-code web application for you to display and share your work.
Once in the generated Mapify App details screen, you have plenty of options to customize the look and feel of your app, as well as specify which features will be made available to the users.
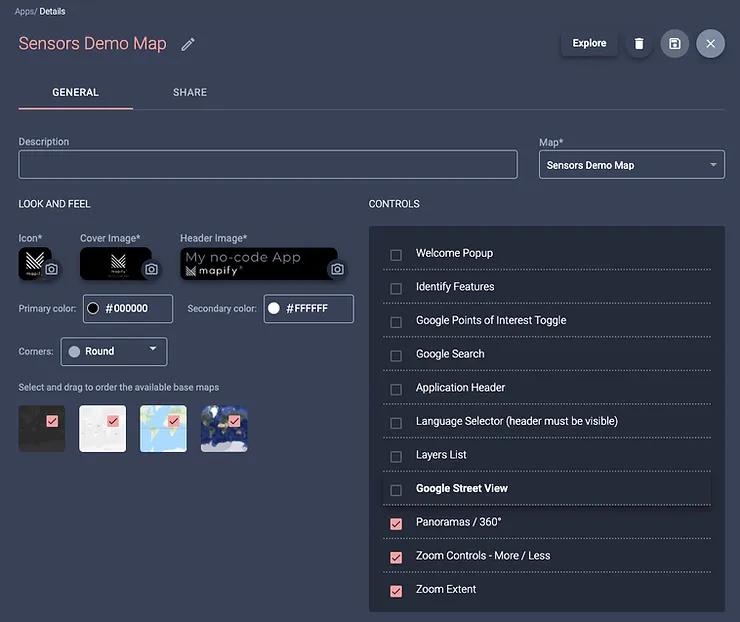
After configuring your app's look and feel, you can define its sharing settings. You can share it privately with your account Mapify users, or publicly. Just remember that if you want to share your application publicly, you will need to provide your own Google Maps API Key.

Once you are done, you can embed the resulting no-code app in your website, or simply share its URL and have your users benefit from your quickly built ready-to-use solution.
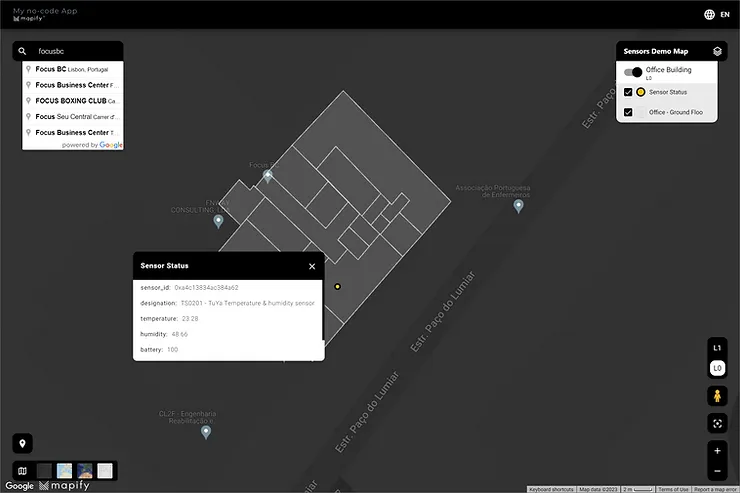
Mapify has a lot more to offer! Our team is looking forward to exploring all the amazing Mapify features that can make your product better, and your customers happier, while also making things easier for your development team.
Sounds like a win-win situation 🤝 Schedule a meeting with us to discuss other IoT solutions Mapify can offer.

.jpg)
.jpg)
.webp)